Friday, June 28, 2013

Indian Chicken


This chicken recipe has been a family favorite for as long as I can remember. My mom always said that it was a Weight Watcher's recipe; but on the recipe card that she gave me at my wedding shower, it says that it is from the Good Housekeeping Diet Book. Either way, it is delicious (and obviously low calorie), and I haven't met anybody who hasn't like it. 

The chicken is a bit spicy from the ginger, cayenne pepper and curry powder; but the heat is offset by the peaches and cottage cheese. I actually love the heat, so I use heaping measuring spoons when I mix my marinade. You should probably try it with leveled spoons the first time, especially if you have newly purchased spices. 

If you didn't know, spices can loose their potency when they sit in your cupboard. If you have had your spices for a while, you might want to think about replacing them. I'm not a big fan of throwing things out, but I AM a big fan of flavorful food. So, use your best judgement. Your taste buds and your nose will be your guide.

This chicken is best if it has marinated for at least 24 hours. Typically, I mix it one day and cook it two days later for dinner. I also love to make a double batch, marinate it all, then freeze half of it the day that I cook the other half. That way the chicken has had time to soak up the marinade before it freezes. 

What You Will Need:
2 Baking Sheets
Aluminum Foil

Ingredients:
4 Boneless, Skinless Chicken Breasts; cut in 1 inch pieces
1/2 teaspoon Ginger
1/8 teaspoon Cardamom
1/8 teaspoon Turmeric
1/8 teaspoon Crushed Red Pepper (Cayenne)
1 teaspoon Curry Powder
1 1/2 teaspoon Salt
1/8 teaspoon Prepared Mustard
1 Tablespoon Milk
2 teaspoons Lemon Juice (I used bottled lemon juice, but fresh squeezed would be better.)
1 Tablespoon Salad Oil
Paprika for sprinkling
1 small Onion, peeled & quartered
1 large can Peach Halves, drained

Directions:
Gather Ingredients

You actually don't need the onion at this point. You
won't use that until you are ready to cook your
chicken in a couple of days.
Cut chicken breasts into 1 inch pieces. Set aside.

Measure dry ingredients (ginger, cardamom, turmeric, red pepper, curry powder, and salt) into a large bowl.

Add mustard, milk, lemon juice and salad oil. Mix well.

Add chicken pieces. Mix well. Cover and refrigerated for at least 24 hours, but 36 - 48 hours is better.

OK, it is two days later and the family is hungry for some dinner. Pull that marinated chicken out of the fridge, and get ready to make some magic. 

Line two baking sheets with aluminum foil. (This step is optional, but it is so much easier to throw away the aluminum foil than it is to scrub those baking sheets clean.)
Set oven to broil.


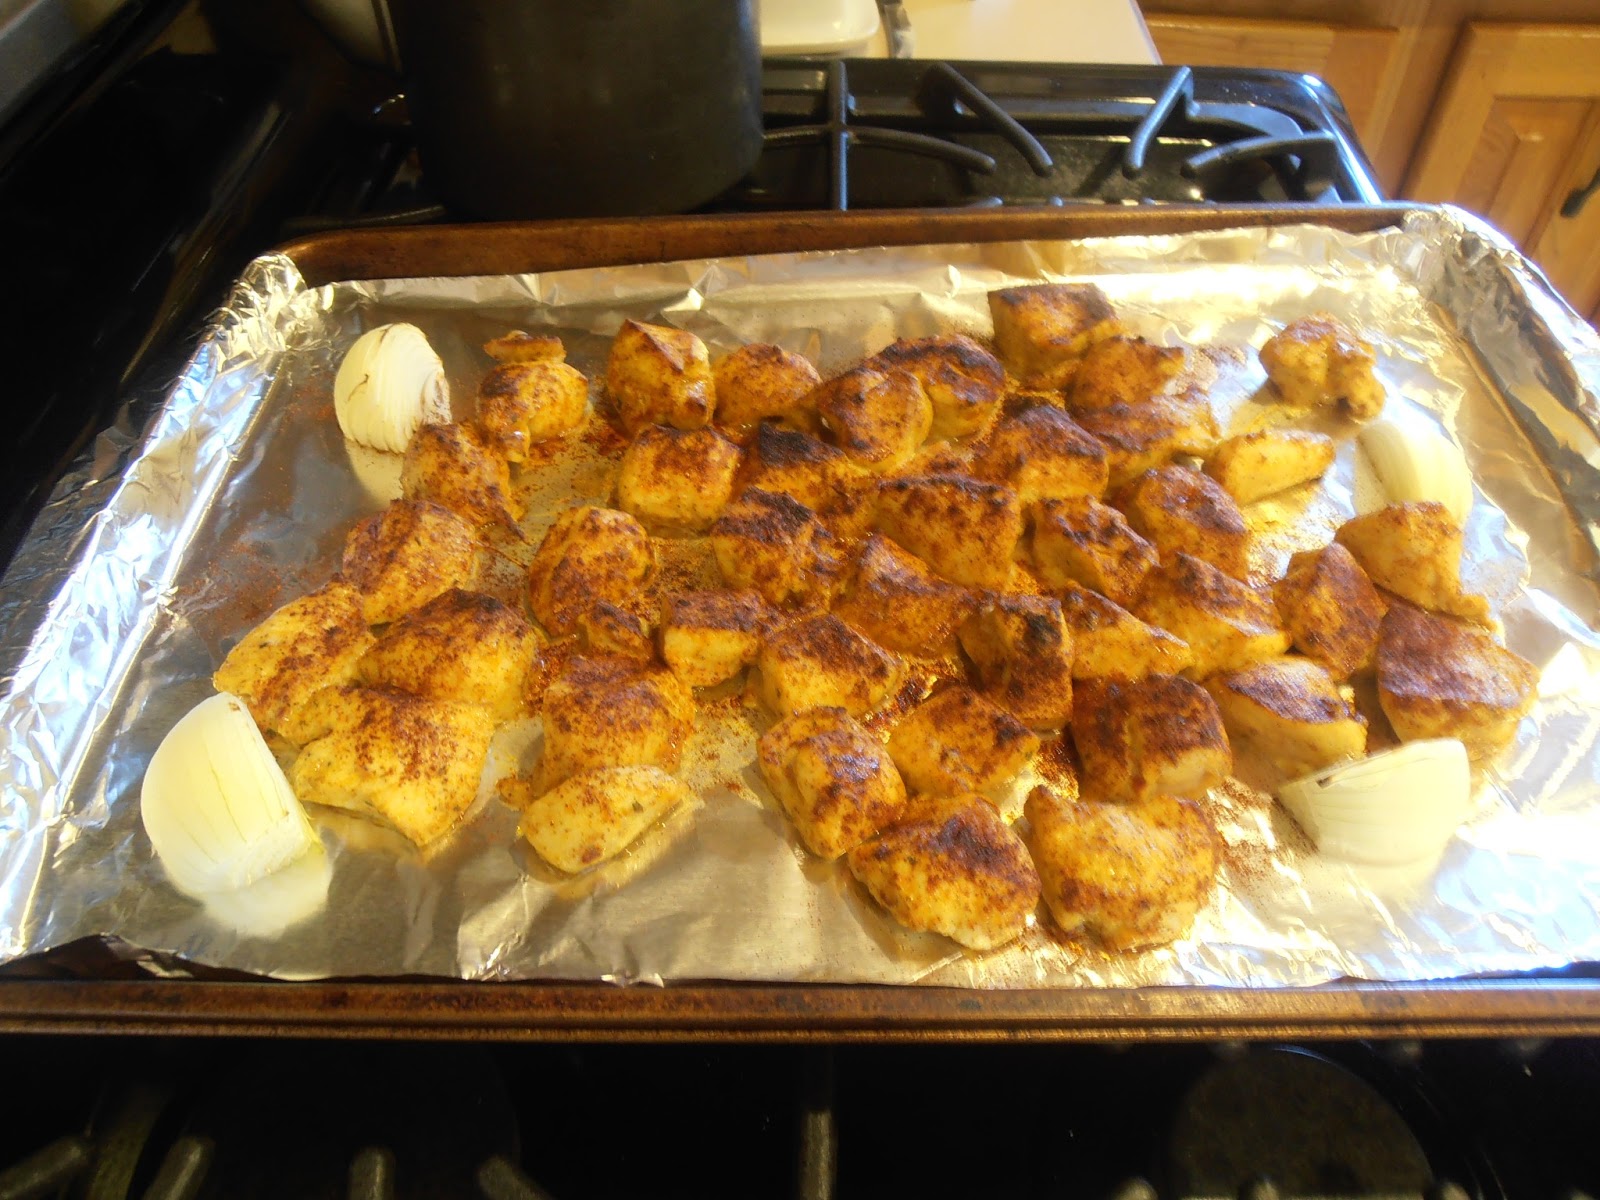
Spread chicken out on an aluminum foil lined baking sheet. Sprinkle with paprika. Place onion quarters on the same baking sheet.

Place the baking sheet in the oven directly below the flame, and set your timer for 7 minutes.

While the chicken is cooking, open the can of peaches, and place them on the other baking sheet.

When the timer beeps, remove the baking sheet with the chicken from the oven. Flip the chicken, sprinkle with more paprika, and return to the oven below the flame. Place the baking sheet with the peaches on a lower oven rack. I know what you are thinking - canned peaches in the oven? Are you crazy? Sounds crazy, but I promise you won't be disappointed. 

Set your timer for 7 minutes again. (If you find that your chicken is cooking faster, reduce the time by a few minutes. You don't want your chicken to be dry, just cooked all the way through.)

When the timer beeps for a second time, remove both baking sheets from the oven. 


Serve the chicken with the warm peaches and cottage cheese.

MMMMmmm! Just looking at the picture now, I can taste the heat of the spices and the sweetness of the peaches. I think I am actually drooling. Thank God you can't see me. That would be embarrassing! 

I hope you enjoy this recipe as much as my family and I do. 

"What I love most about my home is who I share it with!"
Sheryl

Wednesday, June 26, 2013

Strawberry Pie


If you read my post on Saturday, June 22 on strawberry shortcake, you know that  my kids, my mom and I went strawberry picking last week. We picked a bunch of berries. And what is the best thing to do with fresh berries? Make desserts, of course. This beautiful, sweet, yummolicious pie was one of those desserts. 

This weekend we had friends over for dinner. They were kind enough to bring really amazing filet mignon steaks for the main course, so I figures I had to have a something special for dessert. Since I had the fresh berries, I figured a strawberry pie made with fresh-picked berries would be a nice offering. Served with fresh whipped cream, it was a huge hit. They really enjoyed it.

What you Will Need:
Pie Crust (posted on May 18, 2013), baked
Pie Plate
Baking Sheet
KitchenAid Mixer with Whisk Attachment

Ingredients:
Pie Filling
1 1/2 pounds Strawberries; washed and hulled
1 cup Sugar
3 Tablespoons Corn Starch
3/4 cup Water

Whipped Cream
1 cup Heavy Cream (Whipping Cream)
2 Tablespoons Sugar
1 teaspoon Pure Vanilla Extract

Directions:
Bake Pie Crust
Sorry, I don't have pictures of baking the pie crust. I wasn't planning to give these directions. Then as I was writing the post, I thought I really should include them. I plan to make a french silk pie this week, so I will include pictures on baking the pie crust with that post. 

1. Once your pie crust is rolled out and in your pie pan, loosely cover it with plastic wrap and chill it in the refrigerator for at least 1/2 hour.

2. Place baking sheet on bottom rack of oven and preheat to 425°F.

3. Once dough is chilled (it should be firm to the touch), pierce bottom and sides with a fork. 

4. Line the crust with a double layer of aluminum foil, making sure the foil is all the way to the edges of the bottom of the pan.

5. Fill the foil with dried beans. Make sure they cover the bottom and go part way up the sides. 

6. Place the pie pan on the baking sheet and reduce the oven temperature to 400°F. Bake for 12 minutes or until the edges of the crust start to turn golden brown.

7. Remove the foil and weights or beans from the pie pan. Continue to bake the pie crust for an additional 15 minutes.

8. Brush the inside of the crust with an egg wash (1 egg beaten with 1 teaspoon water).

9. Bake the crust for an additional 3 minutes.

10. Let the crust cool completely.

Pie Filling
1. Arrange half of the strawberries in the cooled pie crust.


2. Mash the remaining strawberries.


3. In a medium saucepan, combine mashed strawberries with sugar. Cook over medium heat to a boil, stirring frequently.

4. In a measuring cup, whisk together corn starch and water. 


5. Gradually stir water mixture into berry mixture. Reduce heat and simmer until thick, approximately 10 minutes, stirring constantly.

I'm not sure the picture shows it, but this is thick.

6. Pour berry mixture into pie crust over berries.

7. Chill for at least 3 hours.
I had a little too much berry mixture, but I couldn't
bear to throw it out. You really should be able to see
the whole berry tips after you pour the mixture in.
It is prettier and more of a show stopper that way.
But it still tasted amazing!

Whipped Cream
For best results, bowl and whisk should be cold. 

1. I placed my bowl and whisk in the freezer for approximately 5 minutes.

2. Beat cream on medium until just before peaks form.


3. Add sugar and vanilla, and beat on high until peaks form. Don't over-beat it, or you will have sweet butter.


Serve pie topped with whipped cream. 

The perfect end to a great dinner. I hope you enjoy it!


"The people who are crazy enough to think they can change the world are the ones who do."
Sheryl

Monday, June 24, 2013

Greek Pizza


Spinach, artichokes, and feta oh my! And that's not all. This pizza is loaded with good stuff like garlic, water chestnuts, parmesan cheese, and yummy spices. 

This pizza is an adaptation of The Pampered Chef's Grecian Party Squares. It was featured in their Season's Best Recipe Collection of Fall/Winter 2002, and has been a family favorite ever since. 

The original recipe uses refrigerated crescent rolls as the crust and dry vegetable soup mix for the spice, neither of which are gluten free. I really enjoy this pizza, so I HAD to figure out a way to make it gluten free. I have already perfected my pizza dough recipe, so the real challenge was coming up with something to replace the vegetable soup mix.

I spent some time meandering through the aisles of the grocery store trying to find something that would work. I finally landed in the spice aisle and found that Mrs. Dash has many of the same ingredients as the vegetable soup mix. After only two attempts, I managed to create a pizza my husband and mother agree is a great equivalent. 

So, when my friend from church called the other day, and asked me to bring something to the funeral home for her daughter-in-law who has Celiac's; I immediately thought of this pizza. I guess when I think about it, it does seem like an odd food to bring for such an occasion; but I'm just not a big fan of gluten free sandwiches. Truth is - I've never really been a big fan of sandwiches at all. So, my mind typically goes to hot food. I also took some "Heaven on Earth" Chocolate Muffins for good measure. Chocolate makes everything better.

I guess I've been a little long winded today, so let's get to making some greek pizza!

What You Will Need:
Pizza Dough - posted on June 20, 2013
Pizza Stone or Pan
Cutting Board
Chef's Knife

Ingredients:
1/2 cup Mayonnaise
1/2 cup Sour Cream
2 Tablespoons Mrs. Dash Original
1 - 10 oz. package of Frozen Chopped Spinach, thawed and drained
1 can (14 oz.) Artichoke Hearts, drained and chopped
1 can (10 oz.) Sliced Water Chestnuts, drained and chopped
4 oz. Crumbled Feta Cheese
2 Garlic Cloves, chopped or pressed
1/4 cup Parmesan Cheese, grated
1/4 cup Parmesan Cheese, shredded (for topping)

Directions:
1. Chop artichokes and place in a medium bowl.

2. Chop water chestnuts and place in the same medium bowl.

3. Chop garlic cloves and place in the same medium bowl.

4. Combine all ingredients, except shredded parmesan cheese in the same medium bowl. Mix well.


5. Spread half of the mixture over the already prepared pizza crust. (Or you can double the pizza dough recipe to make a large pizza and use all of the topping.)

6. Sprinkle shredded parmesan cheese over topping.

7. Bake for an additional 15-20 minutes or until crust is golden brown. (If you are making a large, you will bake an additional 20-25 minutes.)


The Mrs. Dash gives it a little kick of pepper that the original recipe didn't have. If you find that it is too peppery for you, just reduce the Mrs. Dash to 1 Tablespoon instead of 2. 

This pizza is great served in smaller pieces as an appetizer as well. In fact, that is how the original recipe was written; but we love it so much, we eat it as a meal. Either way, it is scrumptious! Enjoy.

"Your mission: Be so busy loving your life you have no time for hate, regret or fear."
Sheryl

Saturday, June 22, 2013

Strawberry Shortcake


Fresh picked Michigan strawberries - there's nothing like them in the world. They are so sweet and juicy. So, when we received the email from the local berry farm that the strawberries were ready for picking, we immediately made our plans to head out there. The hardest part of picking strawberries, besides crawling around in the hay on a hot, summer day, is stopping. They look and taste so good, you just want to keep picking all day. We managed to pick almost 12 pounds (plus what we ate while picking) before we came to our senses. 

Below are pictures of my kids, my mom and I on our big adventure. The kids had so much fun. They reminded me of me as a kid. They didn't want to leave. I promised that if we ate all the strawberries and they still wanted more, we could always go back and pick more. That did the trick. And trust me, I'll keep my promise, because I love fresh berries and the farm isn't much farther than the grocery store.


What do you do with all of those fresh berries, you ask? You make dessert! Lots of dessert - strawberry shortcake, strawberry pie, strawberry topping for ice cream . . . 

So, let's talk strawberry shortcake. Lots of people use angel food cake for strawberry shortcake. That's fine. I like angel food cake, but did you know that it takes 12 egg whites to make an angel food cake? What are you supposed to do with all of those egg yolks? I couldn't think of anything, so I decided to go with a more traditional, biscuit-type shortcake. I'm really glad I did. It tastes great, and makes a stunning presentation.

What You Will Need:
Square Baking Dish (8 x 8)
Non-Stick Cooking Spray
Cooling Rack
KitchenAid Mixer with Whisk Attachment

Ingredients:
Strawberries
1 1/2 pounds Strawberries; washed, hulled & quartered
3 Tablespoons Sugar

Shortcake
3/4 cup Soy Flour
1/2 cup Tapioca Starch/Flour
1/2 cup Potato Starch
1/4 cup Ground Flax Meal
1 teaspoon Xanthum Gum
2 teaspoons Baking Powder
1/4 teaspoon Baking Soda
2 Tablespoons Sugar
3/4 teaspoon Salt
1 1/2 cups Heavy Cream (Whipping Cream)

Whipped Cream
1 cup Heavy Cream (Whipping Cream)
2 Tablespoons Sugar
1 teaspoon Pure Vanilla Extract

Directions:
Strawberries
1. Mix strawberries with sugar. Store in the refrigerator in a covered container.

Shortcake
1. Spray baking dish with non-stick cooking spray. Set aside.

2. Preheat oven to 400° F. 

3. Sift together soy flour, tapioca starch, potato starch, flax, xanthum gum, baking powder, baking soda, sugar and salt. (I measured all of my ingredients into my sifter, sifted them onto a large piece of wax paper, and transferred them to a bowl. NOTE: The flax is courser than the other ingredients, so it makes the sifting a little more difficult.)


4. Add cream to dry ingredients. Mix until combined.


5. Dump mixture into baking dish. Spread it out with slightly damp hands. The shortcake won't change shape much in the oven, so make sure to spread it to all corners of the pan. Bake for 20-25 minutes or until golden brown.


This one is just a touch under done. Let it get
more golden than this.

6. Remove from pan and cool on wire rack.
I forgot to spray my pan, so I had to cut it
in half to remove it from the pan. You shouldn't
have to do this.

7. Cut into 6 pieces and in half horizontally.

Whipped Cream
For best results, bowl and whisk should be cold. 

1. I placed my bowl and whisk in the freezer for approximately 5 minutes.
Don't laugh. I tried to get as little of the freezer
in the picture as possible to avoid the embarrassment
that would result from you seeing what a mess it is.
2. Beat cream on medium until just before peaks form.


3. Add sugar and vanilla, and beat on high until peaks form. Don't over-beat it, or you will have sweet butter.


Strawberry Shortcake
Place one half of the shortcake on the plate, top with strawberries and a dollop of whipped cream, top with the other half of the shortcake. Admire it's beauty, take a mental picture (or a real one to post on instagram, facebook, twitter or the social media of your choice) and eat it all up!

MMMM! I think I might just have to go back and pick some more strawberries, so we can have this again. 

"The biggest mistake you could ever make is being too afraid to make one."
Sheryl