Showing posts with label glutenfree. Show all posts

Monday, May 20, 2013

Chicken Pot Pie


Chicken pot pie - one of my go-to comfort foods. I love, love, love chicken pot pie! Don't you? I mean, what's not to love? Buttery, flaky crust on the outside with chicken, vegetables and creamy goodness on the inside. Who could ask for anything more? It is so delicious and comforting! What's even better is it is fairly simple to put together.

What You Will Need:
2-Quart Saucepan
Deep Dish Pie Plate

Ingredients:
1/2 cup Frozen Peas, thawed
1/2 cup Carrots, chopped and steamed
1/3 Butter or Margarine
1/3 cup Tapioca Starch/Flour
1 teaspoon Onion Powder
1/2 teaspoon Salt
1/2 teaspoon Pepper
1 1/2 cup Chicken Broth (I use chicken soup base instead of broth to get a richer flavor.)
2/3 cup Milk
4 Chicken Breasts, cooked and cut into 1 inch or smaller cubes (I usually cook these the day before; but if you are making the pastry dough the same day as the pot pie, you can cook the chicken while the pie crust is being refrigerated.)
Pastry Dough (See my post from May 18, 2013) (I usually make this the day before as well; but if you have a couple hours, you can make it the same day.)

Update: My hubby thinks I need to explain how to cook the chicken. You can really cook it anyway you want. Leftover chicken would work great in this recipe. But I never have 4 chicken breasts leftover, so I always cook the chicken just for this. I use a covered casserole dish. I spray it with non-stick cooking oil spray; place the boneless, skinless, cleaned chicken breasts in the dish (as I state below under optional changes, you can sprinkle some extra virgin olive oil and seasoning on the chicken at this time); and bake covered for approximately 30 minutes at 350°F. 

Directions:
1. Roll out one disc of pastry dough following the directions in the pastry dough post. Make sure it is large enough to cover your whole pie plate.


2. Roll pastry dough onto your rolling pin and place in pie plate. Shape dough to pie plate. Set aside.


As you can see, I didn't make mine quite large enough.
It should come up over the lip of the pie plate.
But that's OK. I was able to make it work anyway.

3. Gather chicken, peas and carrots.


 4. Heat butter in saucepan over medium heat until melted.


Make sure to watch it closely. You don't want
brown or burned butter.
5. Stir in tapioca starch, onion powder, salt and pepper. Cook, stirring constantly until mixture is bubbly. Remove from heat.


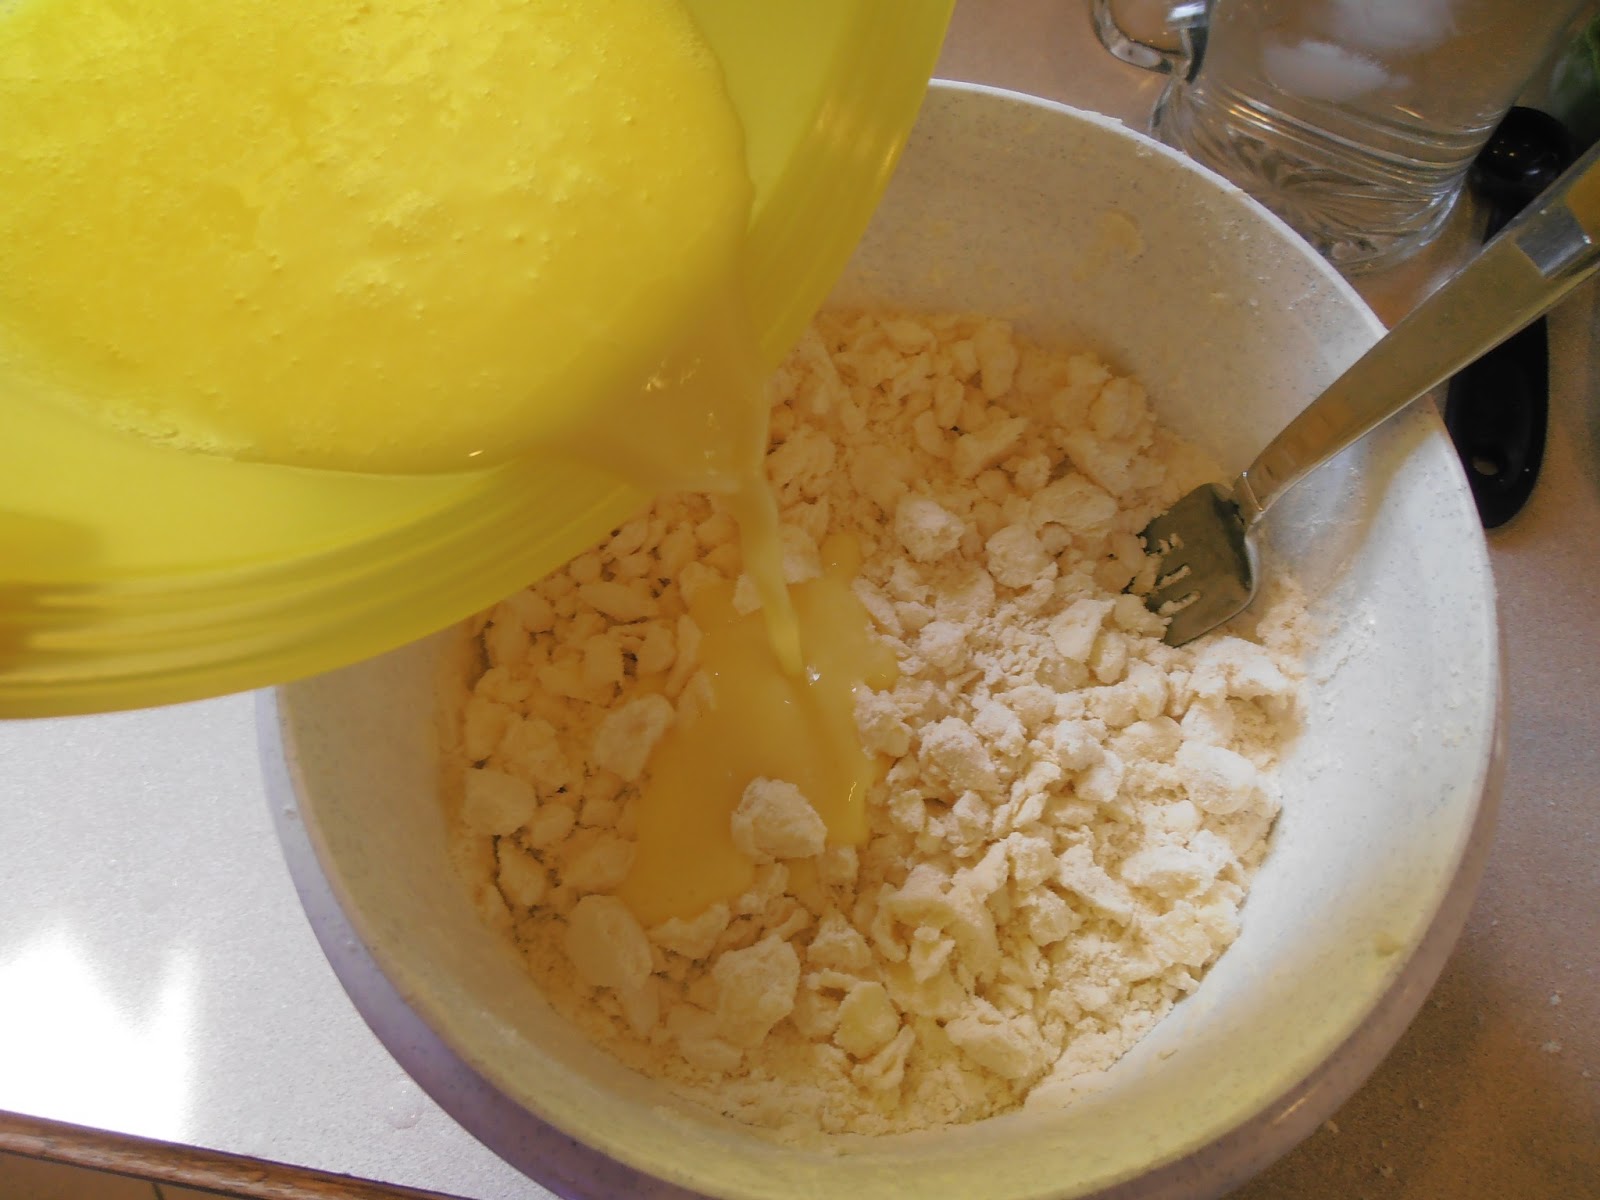
Cooking equal parts of flour and butter 
together = a roux (pronounced rooh). When you
add liquid (stock, broth, milk, etc.) to the roux and 
cook them together, the liquid is thickened. 
6. Stir in broth and milk and return to heat. Cook to boiling, stirring constantly. 


7. Stir in chicken, peas and carrots. 


8. Preheat oven to 425° F. Pour chicken mixture into pastry-lined pie plate. 


 9. Roll out second disc of pastry dough. Roll dough onto rolling pin and place dough over filling. Turn edges under and pinch together. Cut three slits in the center to release steam.


See, even though the bottom crust wasn't
big enough, it still worked out.
  10. Bake in oven for approximately 35 minutes or until golden brown.


There it is, baking in the oven. MMmm.
I can hardly wait to eat it.

Golden brown and ready to be served!
11. Let cool slightly. Cut into slices, and serve.


It is so good that it takes all of my will power
not to go back for seconds. Sometimes I don't win the battle. 
Optional Changes:
1. Add onions, mushrooms or your favorite vegetable(s).
2. Pour olive oil and italian seasoning over chicken breasts before cooking them to add a deeper flavor.

I look forward to hearing what you think. Please leave your thoughts in the comments.

"Oh, taste and see that the Lord is good! Blessed is the man who takes refuge in   him!" ~ Psalm 34:8 ESV

Sheryl


Saturday, May 18, 2013

Pastry Dough/Pie Crust


I am so excited about this post. Pastry dough was another one of those things that eluded me for some time. I lived several years without it, just like my beloved brownies. The horrible thing about living without pastry dough is the fact that you have to live without lots of really delicious things, because it can  be used in so many wonderful ways, both savory and sweet. I tried a few recipes before getting this one right. Most of them were just too grainy. What I was looking for in a pastry dough was flaky, buttery goodness with no grit or grain. Do you want to know how I achieve it? Read on.

What You Will Need:
Pastry Cutter (If you don't have one, you can either pick one up at any store that sells kitchen gadgets for about $6.00 or you can use two butter knives and kind of work them in a scissor motion.)
Rolling Pin
Silpat or silicone mat (optional) - (If you don't have one of these, you can roll your dough on a well-floured surface. However, if you plan to make pastry dough on a fairly regular basis, I highly recommend investing in one. Even though I still have to use some flour with my silpat, it is still much easier to roll the dough.)
Plastic Wrap

Ingredients:
1 cup Soy Flour
1/2 cup Tapioca Flour/Starch
1/2 cup Corn Starch
1/4 cup Potato Starch
1 teaspoon Xanthum Gum
2 Tablespoons Sugar
1/2 teaspoon Salt
1 cup Butter, cold
1 Egg, cold
1 Tablespoon Apple Cider Vinegar
4 Tablespoons Water, Ice Cold

Directions:
1. In a bowl, whisk together the soy flour, tapioca starch, corn starch, potato starch, xanthum gum, sugar and salt.


2. Cut in the butter using the pastry cutter or two butter knives until you have lumps the size of kidney beans. 


I slice my butter into tablespoon size slices when
I add it to the bowl to make the job easier.

In case you have never seen one,
this is what a pastry cutter looks like.

This is the mixture after I used the pastry cutter.
3. In a separate bowl, beat the egg with a fork; then beat in the vinegar and water.


4. Stir the wet ingredients into the dry ingredients using a fork. You may have to finish the job with your hands. (Make sure they have been freshly washed.) You want the dough to come together to form a ball.


5. Divide the dough in half, place on plastic wrap, flatten into a disk, and wrap in the plastic wrap. Refrigerate for 1 or more hours. 


6. When you are ready to use your dough for whatever yummy deliciousness that you have chosen for the day, lightly flour your silpat and the top of your dough before rolling. Be sure to check occasionally that your dough isn't sticking to the silpat. Add more flour between the dough and your silpat if necessary. Roll the dough to the size you desire.


I received this rolling pin for Christmas,
and I just LOVE it!

This is my rolled out dough. It isn't perfect,
but that is OK. I prefer to think of it as artisan.
In my opinion, handmade dough shouldn't
be a perfectly formed shape.

There it is - a beautiful, buttery, flakey pastry dough just waiting for it's delicious destiny. What will you make with your dough? This particular ball of yum was used to make chicken pot pie. (Look for that in my next post.) You can use it for both sweet and savory dishes. Some of our favorites are apple pie, apple tart (This is a free formed bundle of joy with apples, caramel, and pecans. - I promise I will share this in a future post), pecan pie, coconut tarts, chicken pot pie. . . oh, the possibilities are endless. Share your favorite use for pastry dough in the comments.

"So, whether you eat or drink, or whatever you do, do all to the glory of God."
~1 Corinthians 10:31
Sheryl


Tuesday, May 14, 2013

Chicken Piccata


"Mom, what's for dinner?" was the text I received from my son on my way home from work today. Of course, my first response was "food", because that is the kind of smart-alec I am. Then I started racking my brain for something to cook when I arrived home. Because I have a long commute from work, my hubby usually cooks dinner, but today he was working late. So, dinner was up to me. Luckily, my hubby had pulled some chicken breasts out of the freezer yesterday to thaw for today's dinner. He's so smart, don't you think? 

Since my hubby is so smart, I at least had something to work with. I knew I could make something with chicken breasts, and it had to be something that doesn't take too long to make. The answer? One of my all time favorites - chicken piccata! We actually had this as one of our entrees at our wedding reception, and I asked the waiter to bring me an extra dish of artichokes. I guess I've always been a little high maintenance.

Anyway, once I decided that I was making chicken piccata, I decided I would use it as my next post too. I figure it is time to prove that I can cook as well as bake. Let's get to it.

What You Will Need:
Large Frying Pan with a Lid
Meat Cutting Board
Meat Knife
Veggie Cutting Board
Veggie Knife
Tea Kettle or Small Sauce Pan

Ingredients:
4 Boneless, Skinless Chicken Breasts (I actually only used 3, because that is what was thawed)
Extra Virgin Olive Oil (enough to cover the bottom of the pan)
1/3 cup Corn Starch
1/2 teaspoon Salt
1/2 teaspoon Pepper
2 teaspoons Garlic Powder
1 teaspoon Onion Powder
1 teaspoon Paprika
2 cups Water, boiling
4 teaspoons Chicken Broth Base (I use Orrington Farms Broth Base & Seasoning. It gives a deeper flavor than chicken broth or stock, and it is gluten free. However, you can use chicken broth or stock in place of the water and chicken broth base if you prefer or are in a pinch.)
2 tablespoons Lemon Juice (I use bottles lemon juice, because I am lazy and cheap. But you can use the juice of a real lemon if you like.)
1 can Quartered Artichoke Hearts (not marinated)
Cooked Rice Noodles to serve the Chicken Piccata over (I figure you can follow the directions on the package for cooking them.)

Directions:
1. Prepare chicken breasts. Cut off any fat. I slice mine in half lengthwise - this helps with portion control, and they take less time to cook. This is where you use the meat cutting board and the meat knife.

2. Boil water. This is where you use the tea kettle or small sauce pan.

3. Meanwhile, mix corn starch, salt, pepper, garlic powder, onion powder, and paprika in a plastic bag (I used a quart size ziploc bag.). Set aside.


4. Mix boiling water with chicken broth base and lemon juice. Set aside.


This is the what the container looks like for the broth base & seasoning I use.

5. Rough chop the artichoke hearts. This is where you use the veggie cutting board and veggie knife.


6. Heat frying pan with olive oil on medium heat.


I took this picture before I added the olive oil.
7. Put chicken breast pieces in plastic bag, seal and shake until well coated.


8. Place coated chicken breast pieces in the hot frying pan. 


9. Flip chicken breast pieces when brown - approximately 1 minute. And cook on second side until brown - approximately 1 minute.


10. Add chicken broth mixture to the pan. Reduce heat to low.


11. Add chopped artichokes to the pan.


12. Put lid on pan, and simmer at low for 20 minutes.


13. Serve immediately over rice noodles.


Delish!! The cornstarch on the chicken breasts helps to thicken the sauce. It is such a simple recipe and so yummy. My family loves it. Serve with your favorite veggie on the side and you have a well-balanced, delicious family meal. 

As always, I would love to hear what you think. I hope you enjoy it as much as my family does.

"Your children will become who you are, so be who you want them to be." 

Sheryl

Sunday, May 12, 2013

Fudge Brownies


Shortly after I was diagnosed, a friend of mine who had a son who was allergic to almost everything under the sun, told me that I should say goodbye to brownies forever. She said she had tried a million mixes and recipes, and it was just no use - brownies just couldn't be duplicated with substitutions. Unfortunately, I believed her, and I lived a brownie-free life for several years. Then one day I thought, "If I can make an amazing gluten free pie crust (I will share that in an upcoming post), than surely I can make a gluten free brownie." And that is just what I did. This recipe makes a thick, fudgee, dark chocolate brownie. I am so happy to welcome brownies back into my life, and I think you will feel the same way.

What You Will Need:
Square Baking Dish

Ingredients:
3/4 cup Unsweetened Cocoa Powder
1/2 teaspoon Baking Soda
1/3 cup Vegetable or Canola Oil
1/2 cup Boiling Water
2 cups Sugar
2 Eggs
1/3 cup Vegetable or Canola Oil
2/3 cup Soy Flour
1/3 cup Potato Starch
1/3 cup Tapioca Starch/Flour
1 teaspoon Xanthum Gum
1 teaspoon Pure Vanilla Extract
1/4 teaspoon Salt

Directions:
1. Preheat oven to 350° F.
2. Grease and flour a square baking dish and set aside.


3. Mix cocoa powder and baking soda.


4. Add 1/3 cup oil and boiling water. Mix until well blended and thick.


5. Stir in sugar, eggs, remaining 1/3 cup oil and vanilla.


6. Mix soy flour, potato starch, tapioca starch, xanthum gum, and salt in a separate bowl. Whisk together until well blended.


7. Mix dry ingredients with wet ingredients just until blended. This is also when you would add yummy mix-ins: nuts, chocolate chips/chunks, caramel bits, etc. 


8. Spread in prepared pan.


9. Place pan in preheated oven, and bake for 55-60 minutes or until toothpick in center comes out clean.


10. Cool completely before cutting and serving.


Don't they look delicious? You know you want to try them. I hope you do, and please post what you think in the comments.

"Sometimes your only available transportation is a leap of faith." ~ Margaret Shepard

Sheryl